
[English] HP-COSMOS EA Manual: From Installation to Option Settings

 INFINOX
Body
Here is the order you need to check when applying HP-COSMOS for the first time, organized into three stages. Read it in this order: the MT5 operating procedure, the chart and dashboard layout, and then the option settings by risk profile. Before applying it to a live account, be sure to go through the same order once on a demo.
1. From launching MT5 to placing the EA on a chart

Dragging it onto the chart from the Expert Advisors section of the Navigator is step 4.
- MT5 login — First check the account number, the server, and whether it is a demo or a live account.
- Open the symbol chart — Open the M5 chart of a NAS100 series symbol. Symbol suffixes differ from broker to broker, so the same index may carry a different name.
- Allow algorithmic trading — The algorithmic trading button on the toolbar has to be on. If it is off, no orders go out even when the EA is attached.
- Attach the EA — Drag HP-COSMOS onto the chart from Navigator > Expert Advisors.
- Confirm initialization — Check the display at the top right of the chart and the Experts and Journal tabs in the terminal.
If initialization stops, check in order: the registered account, whether it is a demo or a live account, whether the symbol is in the NAS100 series, and whether it has been attached twice to the same M5 chart. It is designed to halt initialization when the conditions are not met.
2. Chart settings and dashboard layout
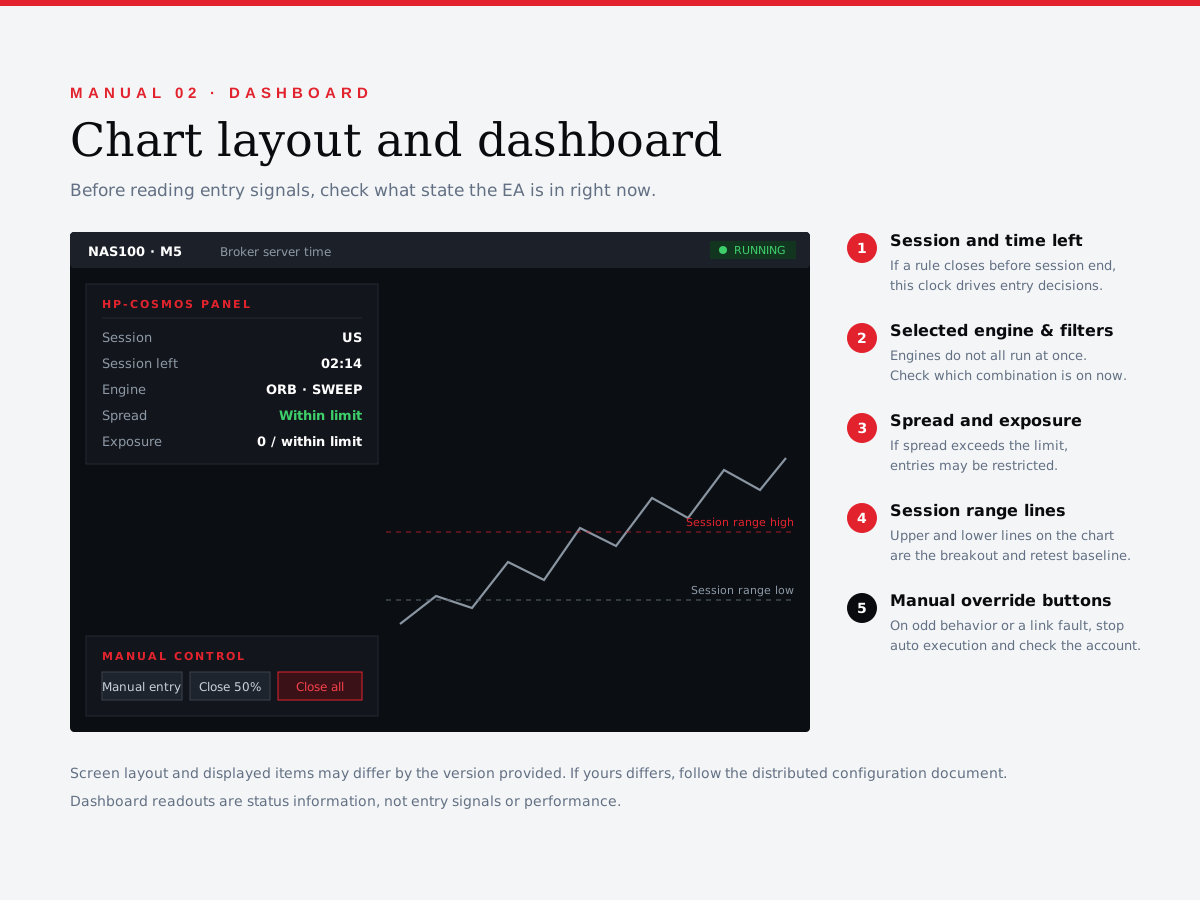
Before the entry signal, check what state the EA is in right now.
- Session and remaining time — If you are using a rule that closes positions before the session ends, the remaining time becomes the basis for the entry decision.
- Selected engine and filters — Not all engines always run at the same time. Check which combination is on right now.
- Spread and exposure — If the spread exceeds the limit you set, entry may be restricted.
- Session range lines — The upper and lower reference lines on the chart are the basis for judging a breakout and a retest.
- Manual intervention buttons — Press through the manual entry, 50% close, and full close paths in advance and learn where they are.
The time display follows the broker server time. Confusing it with your local time will throw your session judgment off.
3. Key option settings — Stable · Balanced · Aggressive

The preset names indicate the direction of the profile and are not a mark that guarantees a safety grade.
- Stable — The risk percentage per trade is set low and the stop loss width wide, so the size shrinks. It keeps the number of entries small and applies a strict spread limit.
- Balanced — A configuration that sets the items above to middle values. Take it as your baseline, adjust one item at a time, and record the results.
- Aggressive — The risk percentage and entry frequency go up. The same adverse move has a larger effect on the account, so you first have to calculate whether it is within a range you can bear.
- Daily loss lock — We recommend leaving it on regardless of profile. When it reaches the limit, it stops new entries for that day.
Start the settings on a demo from the most conservative values, change only one item at a time, and record the results. The initial values are not recommended values, and depending on the account size they can exceed the risk percentage you intended.
The screen layout and setting items may differ depending on the version provided. For the actual input values, follow the distributed configuration document and the consultation guidance. Algorithmic trading and leveraged products can produce large losses even over a short time, and no setting guarantees a loss limit or execution at the intended price. This article is educational guidance and is not investment advice or a solicitation to trade.
INFINOX
INFINOX
INFINOX
INFINOX
INFINOX
Comments0